


Just a quick reminder, our team meeting for October is the 14th - Wednesday at Charlene's house. If you didn't get the directions, send a message to madeforcache@gmail.com and I'll get them to you.
Don't forget to bring your challenge item for the theme of autumn/harvest and to send me a pic for show and tell.
Hope to see you there!!
Tuesday, October 13, 2009


Bright Ideas for Holiday Treats

I saw an ad online today for a fun website sponsored by Mars candy company - the makers of M & M's, Twix and all those other favorite candies. The site is fun because it has lots of great ideas for cookies and other treats for Halloween as well as other holidays coming up.
These treats look great for parties and are fairly simple and fun for kids to help with.
Check it out, it's www.brightideas.com
Monday, October 5, 2009
Message Luminaries

I found another great craft from the Queen of Craftiness - Martha Stewart.
These message luminaries are great for upcoming fall or Halloween parties. You could have them say any message from the "I'd turn back if i were you" to "the Party is this way" or anything else. You could also just use shapes like fall leaves, pumpkins, or anything else that would fit your party theme.
Materials:
- Brown-paper bags (two for each lantern)
- Votive or pillar candles in a glass
- Stencils- either from the craft store, or make your own on the computer
- Craft knife
- Scrap cardboard
- Glue stick
Stencil letters, words, or designs onto one bag. Experiment with different bag sizes and typefaces; inspiration for script styles can be found in the art section of your local bookstore or library.Slide a piece of cardboard inside bag for a cutting surface, and cut out letters or shapes with the utility knife. Do not discard center cutouts from letters with closed shapes, such as A, D, and O.
Step Two:
Fold the top edge of the second bag over twice. Trim top of stenciled bag so it is slightly shorter than the bag with the folded edge. Run glue stick around edges of letters inside stenciled bag. Place bag with folded edge inside stenciled bag, tucking stenciled bag's top edge under inner bag's folded top edge. Press bags together at stenciled area; hold until glue sets.
Step Three:

Gather center cutouts saved from letters with closed shapes. For each one, glue the cutout onto inner bag exactly behind the corresponding letter on outer bag, creating the illusion of a printed letter. With lights shining inside bags, an O, for instance, should look a ring instead of a big round hole.
Now set up your display and light candles. Hold candle in its glass, halfway down in bag. Light wick with a lighter, and lower it carefully into bag. You can also use battery-powered or flameless candles if you choose.
For more great ideas from Martha Stewart, check out this craft and others here.
Wednesday, September 30, 2009
Use Old Stuff in New Ways
I was surfing the web today and saw this cool article on ways to use stuff you probably already have to make things around the house a little less messy or easier. I found myself nodding and thinking, wow that IS a great idea :)
With 50 different tips, there's bound to be something you can use. So take a look and see what will work for you!
With 50 different tips, there's bound to be something you can use. So take a look and see what will work for you!
Friday, September 25, 2009
Search Engine Optimization Helps
So, SEO is super important to get your stuff noticed on the web and Etsy has been working hard to help shop owners make the most of it.
They've just compiled a guide with the help of some SEO gurus and have made it available on their site here.
So download it, read it and use it and I'll bet you a dollar that you'll see an improvement in the traffic on your site. To see the increase in traffic, make sure you've installed Google Analytics and you'll be able to track your progress.
Get optimizing and have a super day!!
They've just compiled a guide with the help of some SEO gurus and have made it available on their site here.
So download it, read it and use it and I'll bet you a dollar that you'll see an improvement in the traffic on your site. To see the increase in traffic, make sure you've installed Google Analytics and you'll be able to track your progress.
Get optimizing and have a super day!!
Monday, September 21, 2009
Fun Fall Wreath Craft

I was looking around for an east autumn project to do when i found this great one from Martha Stewart - gotta love her!
It looks pretty easy and the materials are inexpensive as well.
All you need is:
A roll of brown craft paper - Dollar tree has it for $1 a roll
A few sheets of metallic paper in fall colors
Coordinating wide ribbon for the bow
A 20" double ring wire wreath form - but get a smaller one if you want to cut out fewer leaves
A staple gun or glue gun
Scissors

Paper Wreath How-To
1. Cut several long, 1 1/2-inch-wide strips of kraft paper. Wrap around a wreath form (ours was 20 inches in diameter) to cover; staple.
2. Cut several 5-by-10-inch rectangles from kraft paper; fold accordion-style. Cut out multiple leaves.
3. Cut more 2 1/2-by-4 1/2-inch rectangles from metallic papers; fold on the diagonal, at a slight curve.
4. Cut out single leaves; gently pinch to create a curved shape. Staple all leaves to wreath form, overlapping. Embellish with a brown satin bow.
If you want to see the craft in it's natural environment, go here
Wednesday, September 16, 2009
September Show and Tell
This month we focused on two things: Halloween and Fall. The team members came up with some great stuff for both.
 Taraduff - Taralee
This hand crocheted hat is for children 2 years and older. Made from 100% cotton yarn, it is machine washable and dry-able. The main part of the had is done in orange yarn with the stem, leaf and curlique in green.
Doesn't her daughter make a super cute model!

 Char's Impressions - Charlene

So that's everything. Next month we'll have great Thanksgiving/ Harvest themed items to show you. So check back here and our shops for new items!
 Taraduff - Taralee
This hand crocheted hat is for children 2 years and older. Made from 100% cotton yarn, it is machine washable and dry-able. The main part of the had is done in orange yarn with the stem, leaf and curlique in green.
Doesn't her daughter make a super cute model!
Elliette Baby - Blaire
This is a hand appliqued onesie sized 3-6 months with hand embroidery that says "Mommy's Little Monster." I appliqued a frankenstein head complete with a scar on the cheek.
This item is great for boys or girls.

This is a hand appliqued onesie sized 3-6 months with hand embroidery that says "Mommy's Little Monster." I appliqued a frankenstein head complete with a scar on the cheek.
This item is great for boys or girls.
I also have a bunch of new fall dresses in great fall colors, so check them out at my shop (Link on left of site).

Kinder Keepsakes - Aly
Made by our newest member is a super cute and small bracelet for baby for Halloween. It has orange and black beads with silver spacers and is extendable so you can get the size just right.
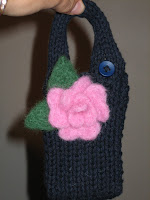
Char's Impressions - CharleneAlthough this cellphone sack was knitted by Taralee, the felted flower was done by Charlene who recently discovered the joys of felting when she won a starter kit at the fair. Super cute and a great imbellishment for things that don't end up in the washing machine :)

Hilfriz - Hilary
Our resident designer came up with these cool Halloween Party invites. This invite says BOO! with spider webs, slime and a cool color pallate of green, orange and black. If you're planning to host a party, I'm sure she can customize them for your event.
So that's everything. Next month we'll have great Thanksgiving/ Harvest themed items to show you. So check back here and our shops for new items!
Subscribe to:
Posts (Atom)
